Category Archives: System

Convert a physical server to a virtual one

Introduction

I needed to “convert” a physical server to a virtual one, in this case I couldn’t and didn’t want to make the same disk partitioning size, but if that’s your case  you can still read. To be more specific, by convert I mean, not to reinstall every services on a brand new virtual machine but simply run what’s on the physical machine. Two reasons, my laziness and most importantly the fact that I’m not sure what was running on. Here goes one solution to do it, we’ll follow these steps:

  • full backup of the physical server
  • prepare the new virtual server on VirtualBox or what you prefer (KVM, etc …)
  • import the backup inside our virtual server’s drive
  • chroot using sytemrescue to update the MBR
  • boot our virtual server
  • Adapt some configuration

Backup !

First things first, do a full backup of your physical server, you can do it that way (adapt it to your use case):

tar -zcvpf mybackup.tar.gz --exclude=/archive --exclude=/mnt --exclude=/proc --exclude=/lost+found --exclude=/dev --exclude=/sys --exclude=/tmp /
Full backup of your server

Be careful with the owners and rights of your files !

Keep that backup somewhere close, we’ll reimport it later.

Virtual Server’s configuration

I’ll only explain how to do it on VirtualBox, if you don’t have it running yet, install it and start it.

Create your new virtual server by clicking on “New”, set your name, your OS type and the version. Just set the parameters as you wish, it depends on your physical server on what you want. Though, once you reach the configuration for the disk, choose vdi and make it a fixed size, it’s quite important for later.

Now your virtual server’s “hardware” configuration is almost done, just set some other settings to your convenience such as the network, boot order (for our test it’s best to select CD first) etc …

We’ll need systemrescue, so download it. Once you have the iso, select it in VirtualBox for your virtual server to boot on. Start it !

This step is about partitioning, so be sure of what you want and what you do. You can simply recreate the same partitions you have on your physical server or just set new ones, just be sure to put enough space for your data to fit in.

qemu-utils and our data

To reimport our data inside the vdi disk we have in VirtualBox we’ll use a cool tool inside qemu-utils. Poweroff your virtual server, it’s very important to not ruin your vdi. Let’s install it and see what we can do with it:

aptitude install qemu-utils
modprod nbd
Install qemu-utils

We need to activate the kernel module nbd too.

Now we’ll link a device /dev/nbd0 to our vdi disk:

qemu-nbd -c /dev/nbd0 <path to your vdi disk>.vdi
Link vdi disk to /dev/nbd0

Create mountpoint directories and mount your partitions:

mount /dev/nbd0p1 /mnt/vs1/boot/
mount /dev/nbd0p3 /mnt/vs1/root/
Mount your partitions

You can now rsync your backup data inside your partitions !

Once your done let’s clean up:

umount /mnt/vs1/root
umount /mnt/vs1/boot
qemu-nbd -d /dev/nbd0
Clean up

Chroot time

Our data is now inside our vdi disk, great, but we can’t boot directly because our MBR doesn’t exist. We need to fix that. Reboot your virtual server on systemrescue. Once you have the prompt you’ll chroot:

mkdir -p /mnt/root/boot
mount /dev/sda3 /mnt/root
mount /dev/sda1 /mnt/root/boot
mkdir /mnt/root/{sys,proc,dev,run,tmp}
mount --bind /proc /mnt/root/proc
mount --bind /sys /mnt/root/sys
mount --bind /dev /mnt/root/dev
mount --bind /run /mnt/root/run
mount --bind /tmp /mnt/root/tmp
chroot /mnt/root /bin/bash
Chroot

If everything went well, you should be “inside” your physical server (as if), check a few files you know to be sure it’s well chrooted (/etc/hosts, content of /home, etc ..) if it’s alright, we can now update the MBR:

update-grub
grub-install /dev/sda
update the MBR

If the commands didn’t yell at you, it’s looking pretty good, you can now poweroff your virtual server. Remove the systemrescue iso and boot your virtual server on its vdi disk, it should work 🙂

Adapt your configurations

A few examples about problems I ran into:

  • careful with your /etc/fstab if you used UUID, you’ll have to change your fstab with a chroot
  • if you didn’t keep the correct owners and rights of your data, it’s possible the virtual server will boot and couldn’t access the data, it will probably try to use a wrong user because of the suid
  • probably a part of your network configuration won’t work, or worse your access to the virtual server, you can clean your firewall with a chroot and then set a NAT rule in VirtualBox to access the machine. In my case, since I had only SSH to my physical server, the keyboard layout was US, and since I have an azerty keyboard it was a pain in the ass. I couldn’t edit easily any file. I decided to SSH on the virtual machine using a NAT rule and to install later the correct layout.
Midi sound with Wine/PlayOnLinux

Introduction

I’ve always loved Guitar Pro 5 as a quite good tool to learn and practice tabs, there are new versions, but I stick to that one. Sadly it only runs on Windows and I don’t have one anymore therefore I decided to run it using PlayOnLinux. After installing Guitar Pro 5 quite easily, I came across one main problem, I had no midi sound. The problem is not only related to Guitar pro, but is related to the need of midi with PlayOnLinux or Wine.

Timidity

As the man says, timidity is a “MIDI-to-WAVE converter and player”,  it simply means for us that it will do the trick between our OS and the software inside PlayOnLinux. Up in !

Let’s install timidity and freepats:

# aptitude install timidity freepats
Install timidity and freepats

Now that we have timidity we just need to make a wrapper to start Guitar Pro 5, or any other software. You can use this script and adapt it to your needs:

#!/usr/bin/env bash

# starting timdity
timidity -iA -B2,8 -Os -EFreverb=0 &

# get timidity's PID
_PID="$!"

# start GP5
/usr/share/playonlinux/playonlinux --run "GP5"

# clean up
kill -9 ${_PID}

Quite simple, we just start timidity then our software, here GP5 is the name of my virtual drive in PlayOnLinux, and we kill timidity. Yeah the kill is bad but SIGQUIT wouldn’t work, I got tired.

Don’t forget to chmod it to be executable.

Finally we can make a shortcut on our desktop (~/GP5.desktop):

[Desktop Entry]
Encoding=UTF-8
Name=GP5
Comment=PlayOnLinux
Type=Application
Exec=/home/floreo/Workspace/scripts/GP5.sh
Icon=/home/floreo/.PlayOnLinux//icones/full_size/GP5
Name[fr_FR]=GP5
StartupWMClass=GP5.exe
Categories=
Path=
Terminal=false
StartupNotify=false
GP5.desktop

As you may notice, line 6 is the call to our wrapper.

Configure MIDI output in Guitar Pro 5

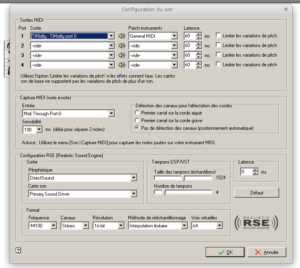
For those who don’t know and are interested about Guitar Pro 5’s audio configuration, once you are done with the setup I’ve shown, you still need to configure the correct MIDI output. In Guitar Pro 5, go to Options > Audio Settings (MIDI/RSE). Select TiMidity port 0 as the first port output device.

GP5 audio settings MIDI

Select TiMidity port 0 as first device MIDI output

Troubleshooting

I didn’t use it enough yet, but I got some cracking sound sometimes, for now I save what i’m doing in Guitar Pro and restart it. I guess the problem could be solved by giving extra parameters to timidity. If I find anything I’ll let you know.

xbox360 controllers with xboxdrv/Dolphin

Ahoy,

I was given a new xbox360 wireless controller at xmas, and I wanted to run my both controllers with one receiver in Dolphin emulator, for whatever reason the normal way didn’t work. Never was the second controller seen in Dolphin !

I went through testing and reading tons of stuff and I ended UP using xboxdrv.

xboxdrv

As mentionned in the man, xboxdrv – A Xbox/Xbox360 gamepad driver that works in userspace !

First step, install the necessary packages:

# apt-get install evtest xboxdrv
Necessary packages

Alright evtest is not that important, but to debug it can be useful.

Now we’ll blacklist xpad to be sure it won’t bother our configuration.

# echo "blacklist xpad" >>/etc/modprobe.d/blacklist.conf
Blacklist xpad

Now you have to reboot before to go on, it’s important.

Back online, plug in your USB wireless receiver. Check it’s there:

# lsusb  | grep -i --color "xbox"
Check the USB wireless receiver is detected

Do the procedure to register your controllers (one after another):

  • Press the X button on the controller
  • Push the “wavy” button on the receiver, it should blink
  • Do the same with the “wavy” button on the controller (tiny little button on top of the controller)
  • The controller should blink briefly
  • Both the receiver and the controller are now linked, light is on, no blinking
  • Do it again for the other controllers

Now we’ll check that xboxdrv is working by listing our receiver(s)/controller(s):

# xboxdrv -L
 id | wid | idVendor | idProduct | Name
----+-----+----------+-----------+--------------------------------------
  0 |   0 |   0x045e |    0x0719 | Microsoft Xbox 360 Wireless Controller (PC) (Port: 0)
  0 |   1 |   0x045e |    0x0719 | Microsoft Xbox 360 Wireless Controller (PC) (Port: 1)
  0 |   2 |   0x045e |    0x0719 | Microsoft Xbox 360 Wireless Controller (PC) (Port: 2)
  0 |   3 |   0x045e |    0x0719 | Microsoft Xbox 360 Wireless Controller (PC) (Port: 3)
xboxdrv -L

As you might have noticed, I have one xbox receiver that can manage up to four controllers (they all do that), explanations:

  • id : receiver’s id (here it’s id 0)
  • wid : controller’s id (column wid from 0 to 3)
  • what’s left doesn’t matter

We can now setup our controllers, you can use my script below, even though you don’t have four controllers, you can still use that script as it is:

#!/usr/bin/env bash

# apt install xboxdrv
# added at session opening
# visudo -f /etc/sudoers.d/xbox360
# floreo ALL = (root) NOPASSWD: /usr/bin/xboxdrv

sudo xboxdrv --daemon  --dbus session \
-i 0 --wid 0 --detach-kernel-driver --mimic-xpad \
--next-controller -i 0 --wid 1 --detach-kernel-driver --mimic-xpad \
--next-controller -i 0 --wid 2 --detach-kernel-driver --mimic-xpad \
--next-controller -i 0 --wid 3 --detach-kernel-driver --mimic-xpad &>/dev/null &

As stated in the commentaries, make sure to configure sudo for your user (here mine’s floreo) and the command xboxdrv, indeed it needs to be root to work.

In my case, everytime my session starts, the script does too. Depending on your OS I don’t know where you can put it. You can also do an init script but it’s more of a bother.

UPDATE: Following this post, I’ve added the –mimic-xpad flag in my script so my right stick would eventually work ! It allows you to control the camera in games for example in Steam which is quite better now.

Launch the script:

# bash xbox360.sh
Launch the script

Dolphin emulator

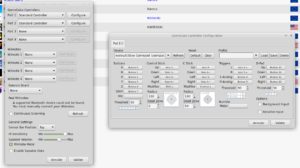
Now open up Dolphin and click on Controllers, in device you should now see evdev/0/Xbox Gamepad (userspace driver) and there should be four of them, the last three ones with a #X. (X being an integer)

Select the first one, press refresh and wait a second. It should now be recognized, press buttons on your controller and the interface should blink in red for every input (try A/B/X/Y first).

If it’s not working, go to troubleshooting else you just can start playing !

Troubleshooting

If nothing works, check again that everything is plugged and that your controllers are registered, do it one more time to be sure.

Kill the script as root and open up two terminals, in one you’ll launch that command:

# xboxdrv --daemon  --dbus session -i 0 --wid 0 --detach-kernel-driver
Start one controller

In the other do that:

# dmesg | grep -iE 'xbox.+'
Check via dmesg

Some result should popup if none then it’s too bad, it certainly mean you didn’t blacklist well xpad, that your kernel’s too old, or something else.

You might try to check with evtest as root:

# evtest
evtest

It should show you a list of what’s connected to your computer, with any luck you could see Xbox Gamepad, if not you’ll have to try to test them.


# ls /dev/input/ | grep event*
List your inputs

You should have a list of several inputs, you can try them one after the other like that:

# evtest /dev/input/eventX
Try the inputs one by one

Press buttons on your controller, if it displays anything then it works.

Well voilà, that’s all I can say for help, good luck, it’s quite long to debug that.