Ahoy,
I was given a new xbox360 wireless controller at xmas, and I wanted to run my both controllers with one receiver in Dolphin emulator, for whatever reason the normal way didn’t work. Never was the second controller seen in Dolphin !
I went through testing and reading tons of stuff and I ended UP using xboxdrv.
xboxdrv
As mentionned in the man, xboxdrv – A Xbox/Xbox360 gamepad driver that works in userspace !
First step, install the necessary packages:
# apt-get install evtest xboxdrv
Necessary packages
Alright evtest is not that important, but to debug it can be useful.
Now we’ll blacklist xpad to be sure it won’t bother our configuration.
# echo "blacklist xpad" >>/etc/modprobe.d/blacklist.conf
Blacklist xpad
Now you have to reboot before to go on, it’s important.
Back online, plug in your USB wireless receiver. Check it’s there:
# lsusb | grep -i --color "xbox"
Check the USB wireless receiver is detected
Do the procedure to register your controllers (one after another):
- Press the X button on the controller
- Push the “wavy” button on the receiver, it should blink
- Do the same with the “wavy” button on the controller (tiny little button on top of the controller)
- The controller should blink briefly
- Both the receiver and the controller are now linked, light is on, no blinking
- Do it again for the other controllers
Now we’ll check that xboxdrv is working by listing our receiver(s)/controller(s):
# xboxdrv -L
 id | wid | idVendor | idProduct | Name
----+-----+----------+-----------+--------------------------------------
  0 |   0 |   0x045e |    0x0719 | Microsoft Xbox 360 Wireless Controller (PC) (Port: 0)
  0 |   1 |   0x045e |    0x0719 | Microsoft Xbox 360 Wireless Controller (PC) (Port: 1)
  0 |   2 |   0x045e |    0x0719 | Microsoft Xbox 360 Wireless Controller (PC) (Port: 2)
  0 |   3 |   0x045e |    0x0719 | Microsoft Xbox 360 Wireless Controller (PC) (Port: 3)
xboxdrv -L
As you might have noticed, I have one xbox receiver that can manage up to four controllers (they all do that), explanations:
- id : receiver’s id (here it’s id 0)
- wid : controller’s id (column wid from 0 to 3)
- what’s left doesn’t matter
We can now setup our controllers, you can use my script below, even though you don’t have four controllers, you can still use that script as it is:
#!/usr/bin/env bash

# apt install xboxdrv
# added at session opening
# visudo -f /etc/sudoers.d/xbox360
# floreo ALL = (root) NOPASSWD: /usr/bin/xboxdrv

sudo xboxdrv --daemon  --dbus session \
-i 0 --wid 0 --detach-kernel-driver --mimic-xpad \
--next-controller -i 0 --wid 1 --detach-kernel-driver --mimic-xpad \
--next-controller -i 0 --wid 2 --detach-kernel-driver --mimic-xpad \
--next-controller -i 0 --wid 3 --detach-kernel-driver --mimic-xpad &>/dev/null &
As stated in the commentaries, make sure to configure sudo for your user (here mine’s floreo) and the command xboxdrv, indeed it needs to be root to work.
In my case, everytime my session starts, the script does too. Depending on your OS I don’t know where you can put it. You can also do an init script but it’s more of a bother.
UPDATE: Following this post, I’ve added the –mimic-xpad flag in my script so my right stick would eventually work ! It allows you to control the camera in games for example in Steam which is quite better now.
Launch the script:
# bash xbox360.sh
Launch the script
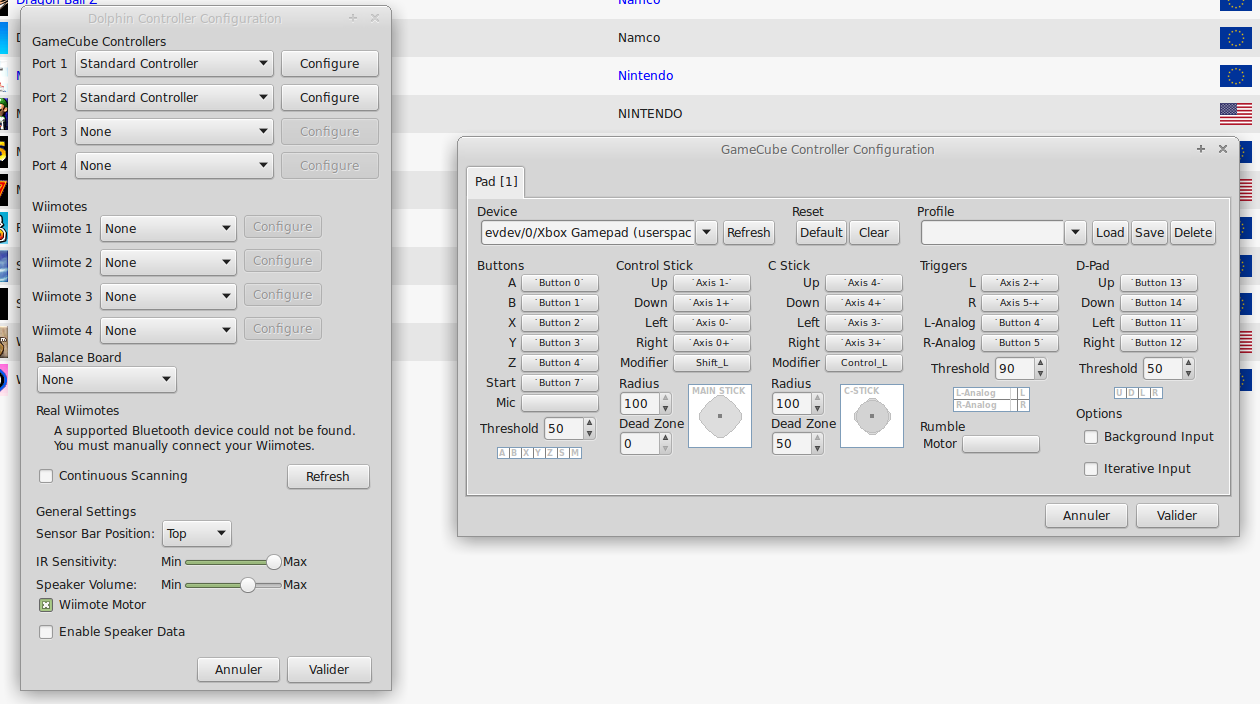
Dolphin emulator
Now open up Dolphin and click on Controllers, in device you should now see evdev/0/Xbox Gamepad (userspace driver) and there should be four of them, the last three ones with a #X. (X being an integer)
Select the first one, press refresh and wait a second. It should now be recognized, press buttons on your controller and the interface should blink in red for every input (try A/B/X/Y first).
If it’s not working, go to troubleshooting else you just can start playing !
Troubleshooting
If nothing works, check again that everything is plugged and that your controllers are registered, do it one more time to be sure.
Kill the script as root and open up two terminals, in one you’ll launch that command:
# xboxdrv --daemon --dbus session -i 0 --wid 0 --detach-kernel-driver
Start one controller
In the other do that:
# dmesg | grep -iE 'xbox.+'
Check via dmesg
Some result should popup if none then it’s too bad, it certainly mean you didn’t blacklist well xpad, that your kernel’s too old, or something else.
You might try to check with evtest as root:
It should show you a list of what’s connected to your computer, with any luck you could see Xbox Gamepad, if not you’ll have to try to test them.
# ls /dev/input/ | grep event*
List your inputs
You should have a list of several inputs, you can try them one after the other like that:
# evtest /dev/input/eventX
Try the inputs one by one
Press buttons on your controller, if it displays anything then it works.
Well voilà, that’s all I can say for help, good luck, it’s quite long to debug that.